Jul 172013
Gila LES361 Heat Control Residential Window Film, Platinum, 36-Inch by 15-Feet
- Cuts cooling costs up to 50 Percent
- Low E coating to help retain winter heat
- Rejects up to 99 Percent of UV
- Rejects up to 67 Percent glare
- Reduces fading of interior furnishings
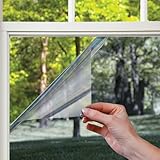
Windows eat up energy. Gila Window Films (aka window tints) can help reduce energy loss and lower cooling costs by up to 50 percent. In addition to providing energy savings, window films and tints block annoying glare and reject UV to reduce fading and help protect interior furnishings. EZ Mount adhesive technology allows for easy window film installation and long lasting performance. Or for an easy on/easy off solution, try our Peel & Cling static cling application. Either way, you enjoy the sa

List Price: $ 40.99
Price: $ 32.58
Follow instructions to the letter!,
My wife and I have now installed this film on several windows and two patio doors in our home. In the process, we have messed up a couple of times, but managed to figure out why (see helpful hints below).
I don’t know how effective the heat control film is at keeping out the heat. Only time will tell.
But here are three recommendations for “frustration free” installation:
1) ALWAYS have someone helping you. Don’t even think about instalilng this without at least two people.
2) Before peeling the film (very sticky) from the liner, spray both sides generously. This helps cut down on the static electricity, which causes the film to curl and stick to itself–often resulting in ruined film and frustrated installers.
3) Gila does not suggest this, but it worked like a charm with us (after we had messed up, unfortunately). Before you peel the liner from the film, have your helper clip two clothespins to the bottom two corners while you hold the top corners (this will prevent the corners from curling and sticking). As your partner begins to peel the liner from the film (slowly!), have him/her spray the sticky side generously. When there is about an inch of liner left to peel, go ahead and apply the film to the window. Before squeegeeing to the window, remove the clothespins and the last inch or two of liner. If you follow this important step, you should not have problems with the film curling. I don’t know why Gila does not suggest this. Maybe they have not thought of it yet.
BTW: I just sprayed regular water on the non-sticky side when squeegeeing the film to the window. I also did this when spraying both sides to ward off static electricity. I did use the Gila stuff, however, on the sticky side of the film and on the window.
Was this review helpful to you?

|Yes, it can be done by one person alone!,
I’m sure it could very well be easier with a couple of people, but I can also see how two people could mess up just as easily, if not moreso I only messed up the first piece before coming up with this method, and then everything onward was flawless.
So here’s what I did. I took each of my rolls and rolled them in the opposite direction on some wrapping paper tubes while I cleaned the windows. This is suggested in the instructions and seemed to work well. I put the re-rolled film outside in the heat while I did the prep work of cleaning windows, and that seemed to help. If it is Winter I guess you can just leave them inside for longer, just re-roll them ahead of time. As I was ready to use the film, I just layed it out flat on the floor to measure and cut to size.
Cut a piece to size as recommended by the instructions. Lay the cut film on a large table clear side up. A long folding table that you can adhere tape to works well. Also, you might have to pull a corner of the film apart to figure out which side of the film is in fact the clear side. Get four (or more) pieces of tape ready (Scotch tape works) each up to about an inch long. I didn’t bother spraying the film with solution before this point, because that can intefere with the adhesion of the tape about to be applied. Plus it is Summer and humid here. I’m not sure if you can get away with not spraying in the Winter.
Now that you have the film on the table (clear side up!)and tape at the ready, start pulling the clear side off and down from one corner. Yes, getting the corner started can be difficult. All I can say is be patient and persistent. Once you have a couple of inches of the adhesive surface exposed, tape the exposed corner down to the table. Keep pulling to expose the remainder of one side, applying tape as you go until you have it tacked down to the table all the way across.
Now you can very easily (and most importantly, by yourself!) pull both corners of the clear sheet down towards the opposite side of the film. You do not have to have anyone there to help you and you do not have to spray the adhesive side as you pull the clear film off as they say in the instructions. Be careful as you approach the end not to curl the the film. Once you have the clear part pulled off, it will try to cling to you from the static–just toss it aside. If you re-rolled the film earlier, it should lay relatively flat.
Now liberally spray the adhesive side of the (still taped down) film, spray the window, and then spray everything all over again. The instructions are right–wetter is better. Grab two corners of the film and pick it up, gently releasing the tape from the table (don’t worry about the tape still being attached to the film, you just trim it off later). Get the film in the general area of where it needs to be and watch the adhesive side get magically sucked down onto the glass! It will move around easily, so move it as necessary to align the one side with the factory edge of the film.
I found that trimming the edges to a little less than an inch of the final trim seems to help with the final trim job. Once the film is on the glass, the rest is cake. Just follow the instructions to squeegee it down and trim. Wetting down the film prior to squeegeeing and also prior to trimming is critical.
Run out of solution? Add a few drops of baby shampoo (or even a drop or two of dish washing liquid) to some water and refill the spray bottle. Avoid ammonia products. It isn’t as viscous as their product, but it’s cheap and you don’t feel guilty about being liberal
And now for my soapbox rant This will help reduce your carbon footprint! Reduce our need for more coal and additional nuclear power plants! There, I said it, and I feel better
Was this review helpful to you?

|This stuff Rocks BUT…,
This is not a project for people who will not read and follow directions exactly and lack patience. If this is you do not buy. You’ll waste your money, waste your time, be mad, and write a crummy review about a wonderful product.
First, the installation kit is junk. Fortunately for me I got a good look at one locally before I purchased. Get a spray bottle, add a cap of baby shampoo and fill with water. Get a good quality utility knife with a new blade. Plastic 4″ wall knife. Long handled squeegee. Squeegee was 2.50 @ sam waltons house of discounts, wall knife was 98 cents at the hardware store, if you lack a utility knife one up to the job is 3 bucks including a few blades. Enough baby shampoo can be had to make gallons and gallons and gallons and gallons of solution can be had at the dollar store for, you guessed it, a buck. You should also have a few single edged blades for scraping the window. You could use the excess blades in your new utility knife but I would recommend a decent quality scraper handle and the associated blades which is a couple of bucks. If you have to purchase everything on my list the bill will be less than 15 dollars and you will have a MUCH better time with your installation.
One spray bottle
Baby Shampoo
Squeegee
Wall knife
Utility knife
Scraping blade
Windex (optional)
Old cotton diaper
Yard Stick
Read the directions. Go to Gila’s website and watch the how to video. It has tricks that you will be very grateful for.
[...]
CLEAN CLEAN CLEAN.
I used windex first and then followed up with solution. Your new squeegee will be very handy. Then I sprayed with solution again and meticulously scraped every inch of window with a single edged blade. You want this to be the cleanest window you have ever cleaned in your life. Buff the streaks out with cotton diaper. Soak your squeegee when done to remove all traces of windex if you opted for this step (recommended). You will also want to remove any bubbled out sealants/caulk on the edges of all panes and PARTICULARLY in the corners if present.
MEASURE MEASURE MEASURE
Use the old carpenter’s adage “Measure Twice, Cut Once”. You’ll want a nice smooth table to lay out on. You absolutely want a helper for this step as the film is tough to manage alone. I used a 9 year old and it worked very well. You REALLY want a perfectly straight cut to avoid wasting material and to make your life easier when you go to install. You’ll want a half an inch extra on all cut edges assuming you make nice, straight cuts. Make your mark, check it twice, and use a yard stick for a straight edge guide.
SPRAY SPRAY SPRAY
Hose the window down, then spray it again. Trust me. Use the tape trick outlined in the directions. Trust me. Hose the film down as you remove the backing then spray it again. Trust me. While you might be able to manage this alone your 9 yr old will come in very handy here too. Film will virtually leap on to the window but, because you have hosed down both surfaces, you can play with it for 30 mins if you need to to get it lined up the way you like it. I worked L to R and aligned the factory edge accordingly. If you dont like what you see, peel it back, hose it down, and do it again. I had a gnat get trapped in the middle of one of mine and I removed the entire sheet and reapplied without the first problem. Work all the big bubbles out and then move on to your next window. Come back in about 30 mins and trim all your edges. Hose window down again and then work it with your wall knife repeatedly until you can make a pass without seeing any bubbles being pushed ahead of the knife. Keep the window wet as you do this to avoid scratching your film.
This is not a slap it up project. The first window will take about an hour, each succeeding one progressively less. Once I hit my fourth one it was taking about 20 mins as I’m now pretty good via practice.
READ THE DIRECTIONS. WATCH THE VIDEO. DONT SHORTCUT. USE LOTS OF SOLUTION.
[...]
Be patient, use lots of solution just like the video instructs and you can have PERFECT results. I will admit the first window I tackled was not perfectly trimmed (but it was virtually unnoticeable) but even that window had not the first bubble or crease. This is when I discovered the let it stand for 30 mins trick. If you do make a slight screwup the next day come back with some scrap pieces if you are as anal as I am and the only person who ever know your trimming was less than perfect will be you. My other panes were virtually flawless.
I bought this for a kitchen nook that faced the rising sun. Real nice @ 6:00 am, hot as hades by 10 and the HVAC was struggling to keep up. First day the results were simply remarkable and I’m logging on to buy a 100 ft roll to do a bunch more of my windows as the specs claim year round savings…
Read more
Was this review helpful to you?

|