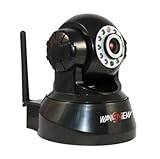
Wansview Wireless IP Pan/Tilt/ Night Vision Internet Surveillance Camera Built-in Microphone With Phone remote monitoring support(Black)
- Simple installation: the installation of network cameras is very simple, only power and networks connection are needed.
- Scope of applications: apply to home, offices, enterprises, supermarkets, schools and other public places.
- Supporting multiple protocols: Embedded operation system supports the TCP / IP, SMTP (simple mail protocol), HTTP, UPNP, etc.
- Alarm Monitoring: Through external alarm device, the alarm information can be sent to your e-box or your mobile phone.
- If WIFI wireless connection is used, only power is a must.
Specs:
Image Compression Format: M-JPEG standard
Image Resolution: VGA(640×480) / QVGA(320×240)
Sensor: 1/4 inch CMOS, 300,000 Pixels
Light frequency: 50Hz, 60Hz or Outdoor
Audio compression: ADPCM
Data rate: 802.11b: 11Mbps (Max.), 802.11g: 54Mbps (Max.)
Ethernet: One 10/100Mbps RJ-45
Viewing angle: 67?
Horizontal Rotating Angle: 0~270?
Vertical Rotating Angle: 0~120?
Alarm Mode: motion detection alarm and I/O alarm
Video Display: Microsoft Media Player
Image Transfer Velocity: 30fps @ VGA
Imag

List Price: $ 52.44
Price: $ 52.44
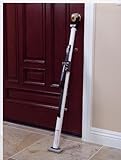
Buddybar Door Jammer
- The Buddybar will not fall off your door.
- There are no plastic parts on the Buddybar.
- The Buddybar is 8.2 lbs. of beautifully powder coated steel.
- Unconditional guarantee against manufacturer defects. See return policy for additional information.
- The patent-pending Buddybar is simply the strongest home security bar on the market.
How much is your personal and family security worth? The answer is priceless, but it won’t cost you nearly that much with the Buddybar Door Jammer. Of course you can buy door jammers that are less than half the price of ours. But before you do, we encourage you to compare the products. We think you will agree that the Buddybar is engineered with far-superior quality and addresses common points of failure in cheaper doorjammers. Now isn’t that peace of mind worth it? Sometimes you really DO get w
List Price: $ 74.95
Price: $ 74.95
Find More Security Products
Can’t complain for all the features it has at its price!,
The camera I got was branded EasyN, but the box art shown on the product info page matches the box I got. Some people claim they have Foscam, Apexis, Hootoo, etc. brand, but I think it’s the same camera branded in different brands to accommodate different markets. I admit, it would HELP if you are tech savvy or at least have some knowledge in network configuration to expedite the set up and get the camera running, but that’s not required. This camera isn’t exactly the most fool-proof camera in the market, but its feature make up for it.
The instructions are readable, albeit choppy due to the poor Chinese-to-English translation. OK here’s the deal. I’m going to write a lengthy semi-review, semi-how-to for this awesome IP camera seeing the need for an instruction for Mac users. First of all, I am a Mac user running on OS X 10.7.2 Lion and I got this bad boy up and running within an hour. For all you Mac users out there, you’ll need to have temporary access to a Windows machine.
If you don’t have a Windows machine, see UPDATE 4 at the end of this review – then follow steps 3 and forward. I’m writing this review under the presumption that the typical user has no knowledge of MAC access control list or WiFi DHCP client table from your router to set-up the camera it via WiFi. You need it to run the application that allows you to detect and configure the camera’s IP. Unfortunately, this application is written for Windows only. But that’s all you need a Windows machine for. Once you configure the camera’s IP address to work with your LAN, then you can use the web interface and configure a whole sleuth of other options, including the alarm feature, FTP, Mail and other. So without adieu, let’s do this!
I’ve taken screenshots to help accommodate the mini guide below. So check out the user-submitted images for 7+ images I’ve added for directions on how to proceed. The instruction is for connecting the camera to a LAN – I chose this route because my WiFi network is secured over several layers of security (Sonic Wall fire wall, MAC control, etc.) and it’s just easier to get the cam up and running through the LAN.
0.) Connect your IP camera to your LAN via ethernet and plug in the power supply.
1.) Get access to a Windows machine. I dual-booted to Windows Vista via Boot Camp. Make sure this Windows machine has access to your LAN.
2.) Run the application with the file name, DevFind.exe – you can find it in the directory, /EasyN F2 series IP camera installation CD/software. My included install disc was a blank CD-R disc!!! so I had to download the CD content ZIP from the manufacturer’s web site: “easyntech . com / ShowDownload . asp ? id = 34″ you can download the manuals in PDF format from the site too).
3.) Run the DevFind.exe to locate your camera, then modify the camera’s IP address so that it matches your LAN’s IP range structure, subnet mask and gateway. The default IP address assigned to the camera should be indicated in a silver sticker located underneath the camera. The same sticker can also be found on the exterior of the box. Basically, the default IP should be something along the line of 192 . 168 . 1 . 126 and access port 81 (it could be different). Since my LAN’s IP range structure is 192.168.0.x, I have assigned the camera an IP address of 192 . 168 . 0 . 155. I changed out the default port of 81 to 310. Understand me so far? Once you got that down, click on the “APPLY” button to make the changes.
4.) Click on the “OTHERS” tab under the Equipment Information field. Take note of the information located in the “MAC” field, it should be a 12 letter/number string of characters.
5.) If you have access controlled enabled in your router, then follow this step. If not, you can skip. What access control means is you only allow certain network devices permission to connect to your LAN. Even if the connecting client knows your WEP/WPA/WPA2 password, they still will not be able to connect to your Wi-Fi unless their device is registered to the access control list. The unique identifier of the network device is its MAC address. If you have this enabled, then add the camera’s MAC address you’ve just jotted down in the previous step to your router’s access control list. The convention should be XX:XX:XX:XX:XX:XX where X is a number or a character from the alphabet. So if your camera’s MAC address is 00A8F700F341, enter it as 00:A8:F7:00:F3:41 Update and restart your router after entering. If you have the means to reserve IP address designation on your router, I would do so. Since I assigned the camera an IP address of 192 . 168 . 0 . 155, I would reserve this address on the router to the camera’s MAC address so that this IP doesn’t get reassigned by the DHCP to another network device by accident.
6.) You’ll definitely need to port-forward your camera if you plan to remote view from outside. In your router setup, go…
Read more
Was this review helpful to you?

|I Love IT!,
Let me preface this review by saying:
I) This is one of the best purchases I ever made — as other reviewers may have already said, the cheap price you pay (I paid $50 for mines) gets you a quality product, a rare commodity these days.
II) This item is solidly built and for its price, has many good features: full rotation scan, e-mail and ftp capabilities, remote administration and much more.
III) Yes, installation does require you to have a bit of a network working knowledge — if you know how to set up a LAN or WLAN and configure a router, you probably wouldn’t need the manual it came with as it is pretty much useless.
IV) You can go to Wansview.com, on the “Service and Support” menu, there’s a “Download” link that you can click on to get to the full user manuals, documentations and software (firmwares, utilities, etc…).
With that said, the following some instructions on how to setup your IP camera with your LAN or WLAN using a Windows PC. Note that some steps were piggy backed off another reviewer (justChill) and I just did a little bit of refinement based on steps I took to set up my camera.
All the things you need are in the box. The software/driver CD that came with my camera does not work, this is a problem that other users also reported. So, if you’re one of the unlucky ones to receive a useless CD, no worries, you can download some of these utilities from the Wansview website as I pointed out on step item IV above. As a matter of fact, you only need 1 utility to do the initial setup and once you connect the camera to your network, the camera itself has a user interface (UI) that includes settings which you can customize, such as e-mail and ftp uploads. The utility can be downloaded from the Wansview site and it’s called “NCB Search_en.rar” However, I didn’t use this utility because I followed justChill’s link and ended up downloading and using a software called “Search IP Camera” from the site easyntech.com. The instructions below refer to the latter software (Search IP Camera).
Again, I can’t stress enough that you must at least have a basic understanding of router and network terminology and configuration before proceeding; otherwise, STOP here, educate yourself or ask your geek buddy to help you.
1) Using the provided ethernet cable, connect your IP camera to your LAN or WLAN router via ethernet port at the back of the router, and plug in the power supply of the camera, also included. The camera’s LED front light shall light up and the port where the ethernet cable is hooked in should be blinking, indicating your camera has been recognized by your network (LAN/WLAN).
2) Now go to your Windows PC (laptop/desktop) and run the software “Search IP Camera.” Alternatively, you can use the one from Wansview but I did not use that so I won’t provide instructions on that.
3) Search IP Camera has two options for configuration. The Wizard and Advance modes. The latter takes you directly to the screen where you can change the IP address and port of your camera. The default IP of your camera can be found on a sticker at the bottom of the camera and it should match the IP that this software detects. The admin account username and password are also on the sticker. Regardless which config option you chose, you will need to set the IP of your camera to match the first 3 segments of your subnet and the 4th segment is the number that will make your camera identifiable within your LAN/WLAN. For example, my WLAN’s subnet is 192.168.1.1 up to 192.168.1.255. My camera’s default IP is 192.168.0.1 SO I changed this to 192.168.1.3 because 192.168.1.1 is used by my laptop and the 2 is used by my TV.
4) After you set up your IP, set your port number. This is the port that will listen for signals and which relay those signals to the camera’s IP. You can chose a number between 1 – 65535. Here’s some more information on ports:
The Well Known Ports are those from 0 through 1023.
The Registered Ports are those from 1024 through 49151.
The Dynamic and/or Private Ports are those from 49152 through 65535.
Whatever port you chose, this is where your camera will listen for request.
5) Now, once you established your IP and port for the camera, click Apply and give the camera a few seconds to acknowledge the new settings.
You are done with configuring your camera’s IP. Even if you disconnect your camera from the ethernet or turn the power off, it will retain this address and port. But if you have a Wireless network (WLAN), also known as Wi-Fi, do not disconnect it or unplug it just yet. You will need to set up the Wireless settings and you can do this using the camera’s built-in UI.
6) Now for the good stuff: open your internet browser and go to your camera’s IP and port. For example, if the IP address you assigned to your cam is 192.168.1.100 and port is…
Read more
Was this review helpful to you?

|Ignore the negative reviews. This offers phenomenal value for the price!,
I am so glad I ignored all the negative reviews slating the camera for being too hard to get working. People really shouldn’t be buying wireless devices such as this if they have no idea how to administrate their home networks. While the instructions included aren’t great, they aren’t nearly as horrible as people make them out to be. I just received my Wansview camera, and I was able to follow each and every step in the included manual and everything worked just perfectly. Granted, I am savvy with administrating my local network, port forwarding, etc, but even without all that work, I was able to get the camera working while wired to my router in no time. Heck, my Brother Wireless printer was a lot harder to get working on my local network…and Brother is a big name, reputable brand!
Sometimes I really am amazed at how entitled people can be. This is a $50 product! Good Logitech webcams alone cost more. This does not cost $200+. If it did, you could whine and bitch about the instructions being a little difficult to understand or installation being too complicated. Let’s look at what you get for $50:
For $50 you get:
- A wireless camera
- IR (night) imaging capabilities
- Pan and tilt (that can be controlled remotely)
- Audio capture (remotely)
- Ability to have two way communication remotely (need to attach a speaker to the camera)
- Access via Web browsers, Android and IOS
- Complex functions like Motion detection and corresponding Alarm functions and automated emailing of pictures, or uploading to an FTP server of choice
- Free Dynamic DNS forwarding provided by Wansview. This is really useful and makes things a lot easier than having to manually muck around with using a separate dynamic DNS provider.
Now, to contrast this, “Blue Iris”, which is a premium software for administrating Wireless/Network surveillance cameras costs $50 alone. That’s just for the software, no cameras included. And Blue Iris doesn’t even include any IOS or Android application!
I received this product yesterday and it was a breeze to get running. I haven’t messed around with advanced features like Motion Detection + Automatic emails yet, but port forwarding and accessing the camera via the internet from my laptop and phone wasn’t too difficult. I really like the free Dynamic DNS provided as it makes life easier and additionally, is not blocked by my workplace firewall (most dynamic DNS providers are blocked).
A word of advice – Don’t bother with the Android/IOS apps. They are very bare bones and not necessary. Once you have the camera set up for remote access, you can use a number of free or $3 apps to access your camera with far better interfaces. I’d highly recommend IP Cam Viewer Pro on both Android and IOS.
Get this product if you’re interested in the feature set advertised in the product description. It does everything it says it does and is probably the most feature packed product I’ve ever purchased for 50 bucks. I still can’t get over how cheap it is considering all that you can do with it.
Was this review helpful to you?

|$50!!!???? That’s CRAZY! I can buy the same thing for under $20, right? WRONG!!!!,
I consider myself a bargain hunter extraordinaire. I compare, read tons of reviews (I always look at the bad ones first!), talk to friends, and then, reluctantly, push the paypal button and cross my fingers – especially if I’ve decided to go for the more expensive version of an item (a rarity for me).
An elderly friend of ours had her apartment broken into (luckily the punks ran when they realized she was home)with one push on her front door that promptly snapped her cheap door jammer in half like a twig. At first I thought maybe she installed it wrong, but when I checked the one on her rear door it was set up correctly. With her permission, I had my 17 year old football player son attempt to push in her back door while I watched. First it slid a little on the floor before catching, and then it popped right out of the base!
I decided maybe she needed some help picking out a better safety system. After seeing that lots of the the products here had the same issues (for the life of me I can’t see how the positive reviews have actually ever tested to see if the thing works!), I went on to google buddybar doorjammers (it wasn’t on Amazon yet). A friend of mine who lives in Phoenix, Arizona actually has this system.
I read through the website and of course was skeptical. FIFTY DOLLARS? Come on! But then I read that it was made of steel, not aluminum, and the interlocking teeth that set it in place logically seemed more sturdy than the slide pole-in-pole with a little tab popping through a hole system. (If you’ve ever had a pool, you know exactly what this system is – and how often those stupid little plastic tabs break off as you’re trying to attach the net to the skimmer pole. I can’t tell you how many nets I’ve gone through!)
Well, given the other negative reviews that were similar to what I had witnessed myself, and the money-back guarantee, I decided to get her the buddybar. $50 might seem like a little bit of money to go to this much trouble for, but in this economy we all better make sure we get what we pay for and at the best price.
About a week later it arrived and I installed it at my friend’s apartment. It was easy to put up, even for the mechanically disadvantaged (me!). Again I enlisted the aid of 225 pounds of highschool testosterone as a consumer test. This time all he got was a sore shoulder. That door didn’t even budge.
So for $50 my friend has peace of mind and a system that will probably outlive her (well, $100 since she’ll be buying another to replace the other crappy under $20 one she had). That’s a small price to pay, and well worth the extra $30 or so. Enough said.
Was this review helpful to you?

|Good for home security but not perfect,
I was one of the first people to get the Master Lock grade of door jammers / door bars, so I can give a good comparison. (I gave a decent review of Master Lock’s model on Amazon: Master Lock 265DCCSEN Dual-Function Security Bar)
[Pros]
Very Sturdy: As other reviewers have noted, Buddy Bar is all steel while the competition is made of aluminum. What they failed to mention is that competing products have key parts made of cheap plastic, such as the piece that holds the door handle. Our Master Lock model had this piece break on us; to our knowledge there was no significant stress exerted on it. Buddy Bar does not suffer this weakness. Also like the Masterlock model, Buddy Bar can be used as a makeshift bat when needed.
Stable: Buddy Bar seems to hold well on wood and tile floors. I did not try it on carpet, but I would guess judging from the design that it would be fine on carpet as well.
Easy to use: Like its Master Lock door bar cousin and similar products, Buddy Bar is easy to adjust.
No installation required: Unlike some door security products like OnGARD, a floor door brace, there is no need to call a contractor to install the Buddy Bar. You also won’t have to worry about having the right type of floor for installation
Better locking mechanism: While not fool proof, the Buddy Bar locking mechanism is better than its Master Lock cousins. It will either totally stop someone or it will buy you additional precious minutes. To my knowledge burglars are already familiar enough with Master Lock’s door brace, where it will only slow them down for approx 8-15 minutes. Buddy Bar will buy you even more time.
Price: While not as cheap as the Master Lock door jammers, Buddy Bar is much cheaper than the total cost of a built-in floor door brace like OnGARD. It’s also a few hundred dollars cheaper than an iron door security screen, and doesn’t make your house feel like a prison.
[Cons]
Weight: due to the quality materials, this is much heavier than the cheaper Master Lock grade of door bars. If you have trouble lifting about 20lbs of weight every day, you will be annoyed. Moreover if the Buddy Bar accidentally fell on a wood or tile floor, I would guess that there would be some damage unlike its lighter cousins. You also probably won’t be taking this while travelling (I use the Master Lock door jams for this sometimes).
Price: While not as expensive as the total cost of a built-in floor door brace like OnGARD and way cheaper than metal door security screens, Buddy Bar is more than double the price of the Master Lock door jammer.
Loosens Door Knob: I’m not sure why but for some reason the Buddy Bar loosens the screws on my door knob over time. I suspect it has something to do with its weight and material, since this wasn’t an issue with the Master Lock door jammer. A little annoying, but all you have to do is check your door knob from time to time and tighten the screws again.
Not totally foolproof: While a lot better than the Master Lock grade of door jams, I do not believe it is foolproof. If burglars can overcome Master Lock door jams, they can eventually figure out the Buddy Bar (though it will take a lot more effort and time). That being said, the best door security systems are installed into the floor such as OnGARD. However just for the product itself, OnGARD is double the cost of Buddy Bar. Not to mention that this doesn’t even include installation which could cost $60-$100+ more since it requires a contractor in most cases (EDIT: contractor costs may be lower or higher depending on your situation: area, type of flooring, and so on).
[Conclusion]
Buddy Bar is a good inexpensive way to secure your door. It is on a good middle ground in door security; not too cheap and not too pricey.
Was this review helpful to you?

|Great piece of gear,
I bought the buddy bar because my girlfriend is living in a shared apartment without a locking bedroom door and she told me she wasn’t comfortable with one of the room mates. So I began searching Amazon for something to secure the door without installing a lock. After searching and reading reviews on products similar to the Buddybar for two hours I finally ordered it. I am quite impressed with the Buddybar Door Jammer; it’s easy to use, very high quality all-metal construction and my 5 foot, 90 pound girlfriend can quickly put it on and off the door with ease. When I installed it, I had my girlfriend grab the bar near the foot and pull to remove it in case of a fire, the Buddybar popped right off. The only complaint I have is the rubberized coating on the head has begun to rub off from a small area after only 4 uses. Despite this small problem I would definitely buy the Buddybar again. Kudos to the Buddybar people on a great product.
Was this review helpful to you?

|